
When it comes to creating or modifying objects in a drawing, usability becomes a key characteristic for CAD software. One of the essential features for efficient manipulating and modifying graphic objects is grips. Grips are markers in the key object points that allow the user to modify an object by mouse and without using the menu or command line.
While embedded CAD primitives are already supplied with grips, custom objects must implement this feature by themselves. The post is intended to describe how to create grips for custom objects using MultiCAD.NET.
The grip management mechanism in MultiCAD.NET permits the user to work with grips of simple and smart types. We have already talked about simple grips in the previous post and in this post will discuss how to work with smart grips. Unlike simple grips, smart grips can have different shapes (circle, triangle, rhombus etc), change specific object parameters, display pop-up menu or perform a set of actions defined in the handler. The smart grips API uses a new unified approach that makes it possible to create simple grips as well.
McSmartGrip class
For representing smart grips in the MultiCAD.NET API the McSmartGrip<T> class is used. This class contains different constructor signatures and handlers of events that are generated by user actions:
MoveGrip— used when a grip has been moved,MouseMove— used when a grip of interactive type has been moved,GetContextMenu— used when a grip of theGripType.PopupMenutype has been clicked,OnCommand— used when a grip of theGripType.Buttontype has been clicked or when a context menu item has been chosen.
For example, to create a simple grip that moves the object, the following constructor can be used:
|
1 2 3 4 5 6 |
var simpleGrip = new McSmartGrip<ObjectRefEntity>(position, (obj, g, offset) => { obj.TryModify(); obj._pnt += offset; } |
This constructor takes a MoveGrip delegate as a parameter. In this example we have used a lambda expression (http://msdn.microsoft.com/en-us/library/bb397687.aspx) to implement MoveGrip that just moves the object position by the offset value.
Adding grips
For adding grips to a custom object, the AppendGrip()of the GripPointsInfo class is used:
|
1 2 3 |
public void AppendGrip(Multicad.CustomObjectBase.McBaseGrip grip); |
The GripPointsInfo class is used as the parameter of the GetGripPoints() method which is used for getting grips whenever the object is drawn:
|
1 2 3 |
public virtual bool GetGripPoints(Multicad.CustomObjectBase.GripPointsInfo info); |
The following code creates and adds the same simple grip:
|
1 2 3 4 5 6 7 8 9 |
public override bool GetGripPoints(GripPointsInfo info) { info.AppendGrip(new McSmartGrip<ObjectRefEntity>(_pnt, (obj, g, offset) => { obj.TryModify(); obj._pnt += offset; })); } |
As you can see the procedure is very compact and requires only one code line. This was the simplest case of grips – simple grips. Let’s see what grip types are supported in the MultiCAD.NET API and discuss specifics of each of them.
Grip types
With MulitiCAD.NET you are able to create grips of the following types:
Simple— simple grip. Grip movements are handled inMoveGrip.PopupMenu— grip that displays a popup menu. Handling is performed byOnCommand.Button— grip that represents a button. Actions that can be called by pressing the button are defined inOnCommand.Interactive— the grip type that is similar toSimple, but can be used with object snaps. Unlike Simple grip, Interactive grip usesMouseMovefor handling grip movements.
Grip Appearance
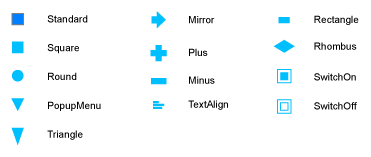
One custom object can have grips of different types, in order to distinguish all of them, you can set the specific appearance to each one defining grip shape and color.
Variety of grip shapes are defined by the McBaseGrip.GripAppearance enumeration. Here are some available shapes:
You can also set the desired grip color from the color set defined in the GripColors class or using standard System.Drawing.Color.
Let’s look how it works on practice and create several smart grips of different types for the TextInBox primitive that was described in the previous post.
Simple grip
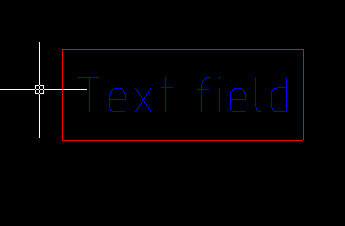
We have already mentioned this grip type above, and as follows from the name it is used for simple action such as moving points of the object. The code below adds a simple grip for moving a corner point of the entity:
|
1 2 3 |
info.AppendGrip(new McSmartGrip(_pnt, (obj, g, offset) => { obj.TryModify(); obj._pnt += offset; })); |
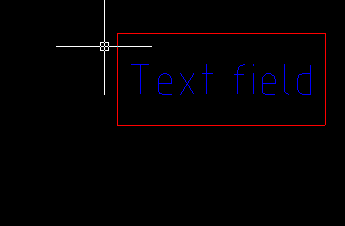
The following picture demonstrates how this grip works:
Button grip
Now we will add a button grip that will control displaying the frame around the text. To create the button, we use the constructor signature that takes the grip type (McBaseGrip.GripType.Button) and the color (GripColors.Base ) of the grip as parameters. If the button is pressed, the handler OnCommand will change the state of the _show_frame indicator to opposite and the button appearance will be changed from the “On” state to “Off” or vice versa. We will set the “On” appearance by default.
|
1 2 3 4 5 6 7 8 9 10 11 12 |
var OnOffGrip = new McSmartGrip(McBaseGrip.GripType.Button, 1, _pnt + stepVector, McBaseGrip.GripAppearance.SwitchOn, 0, "Hide Frame", GripColors.Base); OnOffGrip.Tag = "OnOffGrip"; if (_show_frame == false) OnOffGrip.SetAppearanceAndText(McBaseGrip.GripAppearance.SwitchOff, "Show frame"); OnOffGrip.OnCommand = (obj, commandId, grip) => { obj.TryModify(); obj._show_frame = !obj._show_frame; }; info.AppendGrip(OnOffGrip); |
Also a registered command can be called as a reaction to button pressing:
|
1 2 3 4 5 6 7 8 9 |
var cmdGrip = new McSmartGrip( McBaseGrip.GripType.Button, 1, _pnt + 2 * stepVector, McBaseGrip.GripAppearance.Circle, 0, "button", GripColors.Base); cmdGrip.Tag="cmd"; cmdGrip.OnCommand = (obj, commandId, grip) => { McContext.ExecuteCommand(grip.Tag.ToString()); }; |
Menu grip
One more grip type that can be created in MultiCAD.NET is a grip for displaying a context menu. This type is used for example, when the user needs to choose a desired value from the list of object parameters. A menu grip can be created by the grip constructor with passing the McBaseGrip.GripType.PopupMenu grip type and the McBaseGrip.GripAppearance.PopupMenu grip appearance as parameters. To enable the menu, the following delegates should be implemented:
GetContextMenu— displays the menu if the grip is clicked,OnCommand— handles selecting menu items.
The following code creates a menu grip that enables a context menu with one item:
|
1 2 3 4 5 6 7 8 9 10 11 12 13 14 15 16 17 18 19 20 21 22 23 |
var ctxGrip = new McSmartGrip(McBaseGrip.GripType.PopupMenu, 2, _pnt + 2 * stepVector, McBaseGrip.GripAppearance.PopupMenu, 0, "Select menu", System.Drawing.Color.Lime); ctxGrip.GetContextMenu = (obj, items) => { items.Add(new ContextMenuItem("Command 1", "none", 1)); }; ctxGrip.OnCommand = (obj, commandId, grip) => { if (grip.Id == 2) { switch (commandId) { case 1: { MessageBox.Show("Command 1 is selected"); break; } } } }; info.AppendGrip(ctxGrip); |
Interactive grip
And the last grip type in our overview is an interactive grip. The main specific of this grip is that it can use the information about the objects which the grip is snapped to and change its behavior depending on this information.
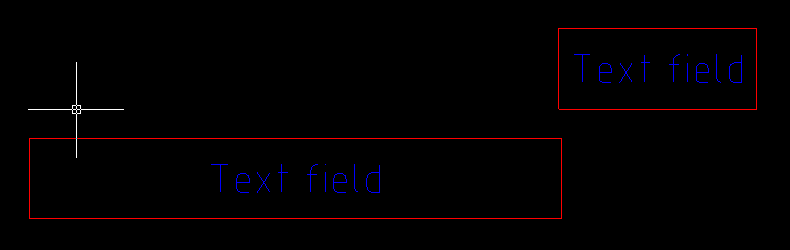
For example, we will add one interactive grip that can replace the text of our TextInBox primitive with the name of a selected object. Depending on the object type, the grip will change its color: default color will be GripColors.Base, if the grip snaps to the parent object the color will be changed to Color.Red, and if it snaps to any other object that supports snap the color will become Color.Green.
An interactive grip can be created using a grip constructor with passing the McBaseGrip.GripType.Interactive grip type. Handling of grip movement is implemented in the MouseMove delegate (unlike simple grip, that uses MoveGrip).
|
1 2 3 4 5 6 7 8 9 10 11 12 13 14 15 16 17 18 19 20 21 22 23 |
var interactiveGrip = new McSmartGrip(McBaseGrip.GripType.Interactive, 3, _pnt + 3 * stepVector, McBaseGrip.GripAppearance.Arrow, 0, "interactive", GripColors.Base); interactiveGrip.IsMovable = true; interactiveGrip.MouseMove = (obj, entInfo, grip, offset) => { grip.Color = GripColors.Base; if (!entInfo.SnapedObjectId.IsNull) { if (ID == entInfo.SnapedObjectId) { grip.Color = Color.Red; } else { grip.Color = Color.Green; obj.TryModify(); obj.Text = (entInfo.SnapedObjectId.GetObject().GetType().ToString()); } } }; info.AppendGrip(interactiveGrip); |
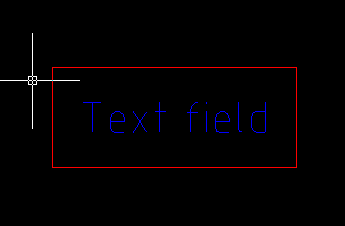
Below is the illustration of how this grip works, the «Text field» string is replaced with «MultiCAD.Samples.TextInBox»:
So, we have overviewed the basic types of smart grips, that allow development of an efficient and usable interface for working with custom objects created in MultiCAD.NET. The API documentation set is delivered with the nanoCAD SDK which is available in the nanoCAD Developer’s Club (registration is required).
